The LivingWordApp User Manual
The full manual, version 1.0, the same words as the copy on your drive. Every picture is described. You can also download it as a plain-text file, which screen readers read easily, or as a PDF whose contents link to each section. For a short guide in 18-point type, download the Large Print Guide (PDF, two pages) and print it.
Welcome
The LivingWordApp is an offline Bible research tool built for close, detailed study — word origins, cross-references, historical numerics, original-language interlinears, and side-by-side comparison across several public-domain and freely licensed translations. Everything in this app works completely offline: no internet connection is needed for any feature, and nothing has to be installed.
This manual covers every feature of the application, module by module. If you're just getting started, read “Getting Started” and “Basic Navigation” first — everything else can be read in any order, as you need it.
The LivingWordApp runs on both Windows and Mac computers. Where the two differ, this manual says so: “Ctrl” on Windows is the “⌘” (Command) key on a Mac.
Note: This manual is separate from the short “Instructions” screen inside the Sandbox module itself. That in-app screen is a quick reference for Sandbox specifically; this manual covers the whole application in full.
Getting Started
What's on the Drive
The LivingWordApp comes on a USB thumb drive. When you open the drive, you'll see:
- Start TheLivingWordApp — for Windows computers. Double-click this to start the app. (Windows may show it as “Start TheLivingWordApp.cmd”.)
- TheLivingWordApp — for Mac computers. Double-click this to start the app on a Mac. (Your Mac may show it as “TheLivingWordApp.app”.)
- TheLivingWordApp for Windows — a folder holding the Windows version of the app. You don't need to open it.
- TheLivingWordApp Data — a folder where your notes and other work are kept. It appears the first time you save something.
- Your license file, shared by the Windows and Mac versions. It’s hidden, so it can’t be moved or deleted by accident.
- Documents — this manual (as a Word document, and as a plain text file that screen readers read easily), a one-page Quick Start, the End User License Agreement, and the Warranty. A Large Print Guide can be downloaded and printed from thelivingwordapp.org.
Please don’t rename, move, or delete anything on the drive. The LivingWordApp finds its license and your work by where they sit on the drive, and a moved or deleted file can stop it from opening or hide your saved work. Computers with only USB-C ports need a USB-C adapter for the drive.
Launching the App
You run The LivingWordApp straight from the drive — there's nothing to install. Keep the drive plugged in the whole time the app is open.
On Windows
- Plug the drive into your computer.
- Open File Explorer and click the drive in the list on the left.
- Double-click Start TheLivingWordApp.
A small black window flashes up for a moment, then The LivingWordApp's loading screen appears. That black window is normal — it's the starter finding the app on your drive. It works whatever drive letter (E:, F:, and so on) your computer gives the drive.
On a Mac
- Plug the drive into your Mac.
- Open the drive in Finder.
- Double-click TheLivingWordApp.
The first time you open it from a new drive, your Mac may show “Verifying…” for up to about a minute while it checks the app. Later launches open in about a second.
The LivingWordApp has been tested on Macs with Apple silicon (M1 and later) and works fully. It runs through Apple’s Rosetta, which most of these Macs already have. If yours doesn’t, the first time you open the app your Mac offers to install Rosetta: click Install (this needs the internet once). Recent versions of macOS may also show a notice about Intel apps each time The LivingWordApp starts; this is expected, and The LivingWordApp works normally.
The First Time You Launch It
Security Checks
Because The LivingWordApp is new software your computer hasn't seen before, the first launch can be slower or show a security message. This happens once, not every time.
- Antivirus check (Windows): some antivirus programs scan a new program before letting it run. You may see the black window stay up for about a minute, followed by a message from your antivirus program saying the file was scanned and is safe. Let it finish; later launches are quick.
- Windows protection message: if Windows shows “Windows protected your PC”, click More info, then Run anyway.
- Mac security message: if your Mac says it can't verify The LivingWordApp, click Done. Then open System Settings, choose Privacy & Security, scroll down to Security, click Open Anyway beside TheLivingWordApp, and confirm.
Registering This Computer
The very first time you open The LivingWordApp on a computer, it will silently register that computer against your license. You won't see anything different — the app will simply open normally. This happens automatically and requires no action from you.
Your copy of The LivingWordApp is licensed for use on a limited number of computers (see “Your License” for the exact number). If you ever see a message saying your license has reached its limit, see the Troubleshooting section near the end of this manual.
Choosing Your Text Size
Before the main window opens, The LivingWordApp asks you to choose your text size. The screen has two large buttons, Standard and Larger. Press either one and the app moves on straight away — your choice is saved on the drive, so it follows you to every computer you use. You can change it at any time; see “Text Size” in the next chapter.
If you're using the keyboard, press Tab to move between the two buttons and Space to choose one. Pressing Escape keeps the current size and moves on.
Choosing How the Bible Text Is Shown
Next, The LivingWordApp asks how the Bible text should be shown, with two large buttons. Page shows the chapter as a page, as in a printed Bible. Verse list shows the chapter one verse per line; press Right Arrow on a verse to list its words, one at a time. Screen readers such as VoiceOver, NVDA and JAWS read it most reliably. Choose either one; you can switch at any time with Ctrl+Alt+R (⌘+Option+R on a Mac). The page view is the usual choice for sighted readers.
If you're using the keyboard, press Tab to move between the two buttons and Space to choose one.
The Welcome Screen
Next comes a short Welcome screen, shown in the size you just chose. Press Continue (or Enter) to go to the main window. If you don't press anything, it continues on its own after about 20 seconds, and a notice at the bottom of the screen says so; pressing a key or moving around the screen stops that countdown so you can read at your own pace.
Tick “Don't show again” if you'd rather go straight to the main window next time. This setting belongs to each computer, so a different computer will still show the Welcome screen once.
The Main Window at a Glance
When The LivingWordApp opens, you'll see:
- A brief loading screen while the app opens its Bible data (usually well under a second).
- A row of module buttons across the top, in four groups: Study a word (Forensics, Strong’s, 1828, Nave, Numerics), Study a verse (Interlinear, Compare, Cross-refs), Explore (Concepts, Journeys), and My Workspace — a menu holding Sandbox, Notes, Scratchpad, Searches and My Work.
- A search bar and chapter browser just below that, with the Help and Credits buttons at the right.
- Large panels below that, where search results, chapter text, and module content appear.
The LivingWordApp always uses its own light colors, even if your computer is set to Dark mode, so the buttons and text stay easy to read.
When You're Finished
Close The LivingWordApp before unplugging the drive. Your work is saved as you go, but closing first is the safest habit. To close it, click the X in the top-right corner of the window, or press Alt+F4. On a Mac, click the red button at the top left, or press ⌘Q.
- Windows: after closing the app, click the drive in File Explorer with the right mouse button and choose Eject, then unplug it.
- Mac: after quitting the app, drag the drive to the Trash (it becomes an Eject symbol) or click the Eject symbol beside it in Finder, then unplug it.
Basic Navigation
Browsing by Book and Chapter
Use the book dropdown and the chapter number field, just below the module buttons, to jump directly to any chapter of the King James Version. The chapter text appears in the main panel.
Words in italics in the chapter are the words the King James translators supplied to complete the sense in English; they have no Hebrew or Greek word behind them. The LivingWordApp shows them in italics, as the printed KJV does. On the first chapter of each book, a line under the heading says who traditionally wrote it, for example “Traditionally attributed to Moses”; for Hebrews, whose writer is disputed, it says “Contentious but attributed to Paul”.
Choosing a new book always opens it at chapter 1, and the chapter number stops at the book’s last chapter.
The Index Button
Click Index (top left) to open or close a list of every book of the Bible, grouped (Law, Wisdom, Pauline Epistles and so on), each with a tick box. Only the ticked books are searched; untick a book, or a whole group, to leave it out of your searches. Everything is ticked to start with. With the keyboard, the arrow keys move through the list, Space ticks or unticks, and Left and Right close and open a group.
Searching
Type a word or phrase into the search box and click Search (or press Enter) to find every place it occurs.
The results appear in the panel on the left. The grey bars between the three panels can be dragged to make a panel wider or narrower, but no panel can be dragged shut, and a search always opens the results panel back up if it has been made very narrow.
To start again, click Clear beside the search box. It empties the search box, the results and the details panel, and takes the search highlights off the chapter, leaving you at the same chapter and verse.
Names can be typed with or without a hyphen. The King James text in The LivingWordApp prints most compound names as one word (Beersheba, Tubalcain), while many printed Bibles hyphenate them (Beer-sheba, Tubal-cain); either spelling finds the same verses.
Searching by Strong's Number
Type a Strong's number in the search box, such as G26 or H2617, and press Enter. The results list every verse where a KJV word carries that number, with those words highlighted, and the details panel shows the number's lexicon entry and every English word the KJV uses for it, with how many times. Put G (Greek, New Testament) or H (Hebrew, Old Testament) before the number; leading zeros don't matter, so H07225 and H7225 are the same. Only the books ticked in Index are searched; if none of them has the number, the notice above the results says how many verses carry it in the whole Bible.
The Word List as You Type
As you type, a list drops down below the search box showing every word in the King James Version that begins with the letters you’ve typed — including each way the KJV prints it, such as lord, Lord and LORD. Use the arrow keys and Enter, or click, to pick a word: it replaces the word you’re typing (in a phrase, only the last word is completed). Press Enter again to search. Pressing Enter with nothing picked searches for exactly what you typed.
If no word in the KJV begins with the letters you’ve typed, the search box turns red with a line through the text straight away, so a misspelling shows before you search.
When a Search Finds Nothing
If a search finds no verses, a notice above the results explains why:
- The word isn’t in the KJV. The search box turns red with a line through it, and the notice offers “Did you mean” links to the closest KJV spellings, with how many verses each finds — for example, “baptise” suggests baptize, and “savior” suggests saviour. Click a suggestion to search for it.
- The word is in the Bible, but not in the books ticked in Index. The notice says how many verses it’s in across the whole Bible.
- Case-sensitive search (Aa) is on and the capitals don’t match. The notice says how many verses it finds without Aa.
- Every word is in the KJV, but never together exactly as typed.
The notice disappears as soon as you start typing again, or when new results appear.
Case-Sensitive Search
The “Aa” button next to the search box toggles case-sensitive matching. When off (the default), searching for “God” also finds “god”. When on, they’re treated as different words — useful when the distinction actually matters. For example, pick LORD from the word list and turn on Aa to find only the verses where the KJV prints LORD, as distinct from Lord and lord.
Advanced Search
Click Advanced Search, near the main search box, to combine up to four separate search terms into one query — requiring some to be present, requiring others to be absent, or mixing both.
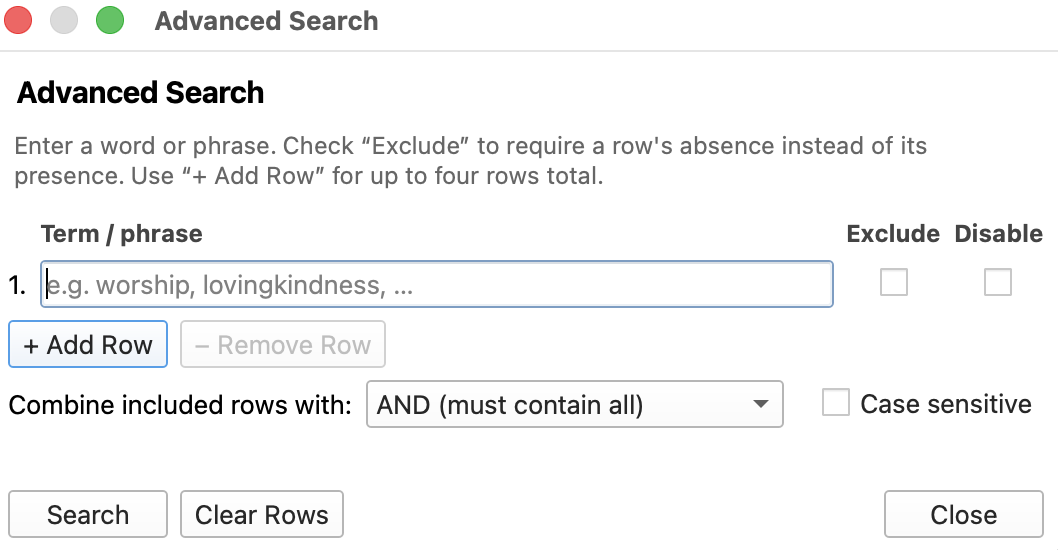
The Advanced Search window, with one empty search row.
- Term / phrase — type one term or phrase per row.
- Exclude — check this so the row's term must be absent from a verse, instead of present.
- Disable — check this to temporarily turn a row off without deleting it.
- Combine included rows with — AND (must contain all) requires every included, non-excluded term to be present, and is the default; switch to OR to match a verse containing any of the included terms instead.
- Case sensitive — check this if letter case should matter.
How to use it:
- Type your first term or phrase into row 1.
- Click + Add Row to add up to three more terms (four rows total). − Remove Row deletes the last row.
- Check Exclude on any row whose term should NOT appear in results.
- Choose how included rows combine, using the dropdown.
- Check Case sensitive if letter case should matter.
- Click Search to run the combined query, Clear Rows to start over, or Close to exit.
Export Results
After running a search, click Export Results on the main search row to save your results as a plain text file. Your computer's own Save window opens.
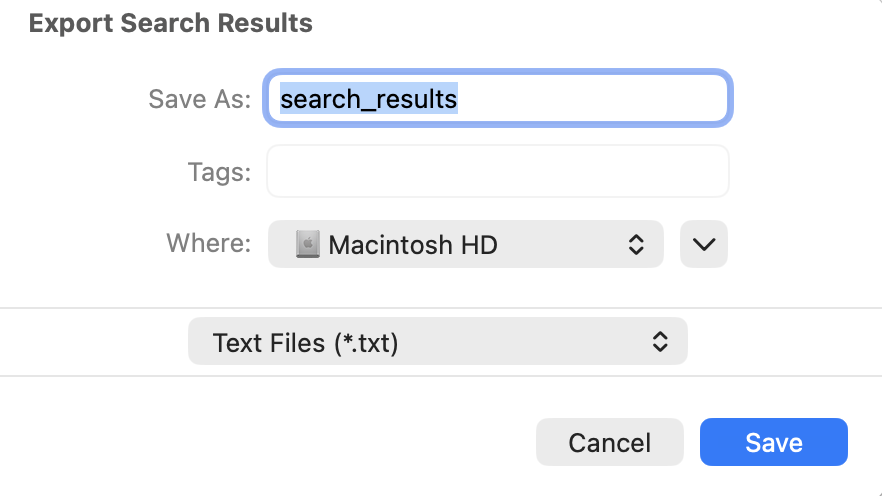
The Save window on a Mac. On Windows it looks different, but works the same way.
- Click Export Results after running a search.
- Type a file name (it starts out as “search_results”).
- Choose where to save the file.
- Click Save, or Cancel to back out without saving anything.
Note: the file type is fixed to plain Text Files (*.txt).
Text Size: Standard and Larger
The LivingWordApp has two text sizes. Standard is the normal display. Larger shows the reading text — the chapter, the details panel and the verse list — at nearly twice the Standard size, and the buttons and other text a little bigger, all in solid black for stronger contrast. In both sizes, search matches are highlighted in black on yellow.
- Ctrl and + (or Ctrl and =) — switch to Larger.
- Ctrl and − — switch back to Standard.
- Ctrl, Shift and L — switch between the two (Windows only).
On a Mac, use ⌘ + and ⌘ − instead. Your choice is remembered on the drive, along with your work.
Larger applies to the main window. The windows that modules open (Notes, Compare, Sandbox and others) keep their standard size for now.
Keyboard Shortcuts
You can move around the main window without a mouse. On a Mac, use ⌘ in place of Ctrl.
- Ctrl+1 or Ctrl+F — go to the search box.
- Ctrl+2 — go to the search results.
- Ctrl+3 — go to the chapter text.
- Ctrl+4 — go to the details panel.
- Ctrl+0 — go to the module buttons.
- Escape — from the results or the chapter text, go back to the search box; your last search word is selected, so you can simply type a new one. From the details panel, Escape goes back to where you came from, usually the chapter text.
- Ctrl+S — save the current search (see “Saved Searches”).
- F1 — open Help, which lists every keyboard shortcut. On a Mac keyboard, press fn and F1 together (F1 alone changes the screen brightness), or choose Help → TheLivingWordApp Help in the menu bar at the top of the screen.
- Ctrl+Alt+R (⌘+Option+R on a Mac) — switch the chapter between the page view and the verse list, which shows one verse per line (Right Arrow lists a verse's words) and is easier to follow with a screen reader.
- Ctrl+] and Ctrl+[ — next and previous chapter.
- Ctrl+Shift+K (Windows only) — set up, or remove, the start-up shortcut. Once it’s set up, plug in the drive and press Ctrl+Alt+L, and The LivingWordApp starts without opening File Explorer, whatever letter Windows gave the drive. It’s also in My Workspace, under Start-up Shortcut.
In the search results, use the Up and Down arrows to move through the verses and press Enter to open one. The chapter opens at that verse. In the chapter text, Up and Down move a whole verse at a time, Left and Right move one letter at a time (hold Ctrl with them, or Option on a Mac, to move a whole word at a time), and Enter looks up the word you're on, just like clicking it.
Using a Screen Reader
The LivingWordApp can be used entirely from the keyboard with a screen reader, such as VoiceOver on a Mac, or NVDA or JAWS on Windows. These tips help it go smoothly.
- Choose Verse list for the Bible text (Ctrl+Alt+R, or ⌘+Option+R on a Mac). Each verse is then read whole, one per line, and Up and Down move from verse to verse. Right Arrow lists the verse’s words one at a time, Return looks a word up, and Left Arrow goes back to the verses.
- In the verse list, a word the translators supplied (shown in italics on the page) is read with “supplied by the translators”, and on a book's first chapter the list's name includes who traditionally wrote the book.
- Use Ctrl+1 to Ctrl+4, and Ctrl+0, to jump between the search box, the results, the chapter text, the details panel and the module buttons.
- Lists are read one line at a time with Up and Down: search results, the Index, Concepts, Notes, Saved Searches, and the cards in Sandbox and Scratchpad. Return opens or runs the line you're on. In Saved Searches, Sandbox and Scratchpad, Delete removes it.
- In the Index, Space ticks or unticks a book or a whole group, and on a Mac, VoiceOver also says how many books are now ticked.
- On a Mac with VoiceOver, My Workspace opens a short list instead of a drop-down menu: Up and Down to choose, Return to open, Escape to go back.
- Help (F1, or fn + F1 on a Mac) lists every keyboard shortcut, one per line.
- This manual is also on the drive as a plain text file, which screen readers read easily. With VoiceOver running, the manual button in Help opens that copy.
If anything doesn't read clearly with your screen reader, please tell us which screen reader you use and what happened; see “Tell Us What You Think” at the end of this manual.
Credits
The Credits button at the right of the navigation row opens a screen listing every third-party data source this app uses — Bible translations, lexicon data, cross-reference data, and more — along with their licenses and this application's own copyright notice. Beside it, Help lists every keyboard shortcut and opens this manual and “Read me first”. My Work, for backing up your work, is in the My Workspace menu; see “Your Work: Saving and Backing Up”.
The Module Bar, Button by Button
Each button along the top opens a different research tool. This section covers each one in the order they appear.
Clicking a word in the chapter looks it up in whichever word tool is showing in the details panel: Strong’s to begin with, or Forensics, 1828, Nave or Numerics if you chose one of those last. So you can stay in Numerics, say, and click one word after another. Click Strong’s to go back to Strong’s.
Forensics
Type a word into the search bar and click Forensics for a quick, one-screen profile of that word: its gematria value in English, Hebrew, and Greek, how many times it occurs in the King James Version (total occurrences, and how many separate verses, chapters, and books it appears in), and a breakdown of every book where it occurs, sorted by how often.
Each book name in that distribution list is a real link — click it to load every occurrence in that one book into the main results list below, without changing your regular search scope or the Index tree’s own book checkboxes. This gives you a quick, one-off, book-by-book drill-down without disturbing whatever search filters you already had set.
Forensics gives you one complete snapshot immediately — it doesn't save anything or let you build on the result. For deeper, ongoing research on a word or number, see Numerics/Sandbox below.
1828
Opens Noah Webster's 1828 American Dictionary of the English Language. Type a word to see its original 1828 definition — useful for understanding how English words were understood at the time many older Bible translations and reference works were written.
Webster's dictionary doesn't include most Bible names and places. For those, the panel shows an entry from Smith's Bible Dictionary instead. The heading always says which dictionary an entry comes from.
The button is called 1828 after the year Webster’s dictionary was published. Smith’s Bible Dictionary is a separate, later work (from the 1860s), used only for the words Webster’s doesn’t have.
Strong's
Shows the Hebrew or Greek word behind an English word of the King James Version: its Strong's number, transliteration, pronunciation, part of speech and full lexicon entry.
Click a word in the chapter (in the verse list, move to the word and press Return). The panel shows the Strong's entry for that word in that verse, with the reference under the word, so the same English word can lead to different Hebrew or Greek words in different verses.
One Hebrew or Greek word often takes several English words. If the word you chose is part of such a phrase, the panel says so and shows the number for the whole phrase. Small words such as “the” or “of” often have no number of their own, because their sense is carried by a neighbouring word. Words the translators added to complete the sense in English are shown in italics in the chapter, as in the printed KJV, and the panel marks them as added.
Most words are linked directly from the tagged King James text. A few were left untagged there, and The LivingWordApp matched them by meaning to one of the verse's own Hebrew or Greek words; for those, the panel says “This link was matched by meaning within the verse; check it in the Interlinear.”
Below the entry is the word list: every Hebrew and Greek word that the KJV translates with that same English word, each with how many times. Type a word in the search box and click Strong's to see the word list on its own. Type a Strong's number instead, such as G26, and click Strong's to see that number's entry and every English word the KJV uses for it.
When you type a word and click Strong’s, rather than clicking a word in a verse, the Hebrew comes first while you’re reading the Old Testament, and the Greek first while you’re reading the New Testament.
Numerics
A quick-reference view related to Biblical numerics. For serious, ongoing numerics research — building on a discovery, combining numbers, keeping a running history — use Sandbox instead, described in detail below.
Nave
Nave's Topical Bible — browse or search by topic to find every verse related to a subject, rather than a specific word. The Nave's in The LivingWordApp is based on Nave's Topical Bible (1896), edited by TheLivingWordApp: verses with words such as saved, justified, sanctified, saints and believer have been added to their topics.
The button is named after Orville J. Nave, who compiled Nave’s Topical Bible. Think of it as a subject index: type a subject, such as faith or prayer, and click Nave to see the verses on that subject, with related topics below. It isn’t the same as Cross-refs, which lists the verses that point to the verse you’re reading.
Journeys
An interactive map of Biblical journeys and events — from Abram's travels to Paul's missionary journeys. Select a journey to see every real named stop along its route plotted on a real map — not just the start and end points — alongside real scripture references for each stop.
Zoom with the scroll wheel or trackpad, or with + and −. The map zooms out only until the world fills the window, and zooms in two steps closer than the most detailed map, for short journeys such as “Saul’s donkey”. At those two closest steps the map looks softer, but the route and pins stay sharp.
The map also shows today’s places, in plain grey and blue lettering: cities and towns, country names and today’s borders (dashed where a border is disputed), seas, lakes and rivers. More appear as you zoom in. They are there to help you see where things are now; the names of the time, in coloured italic lettering, are the ones that belong to the journey. Untick “Show today’s cities, borders, seas and rivers”, above the map, to hide them. They come from Natural Earth (naturalearthdata.com), which is public domain.
To find a journey, type in the box above the list. It matches journey titles, and also places: type a place such as Laban and the list shows every journey whose route passes near it, each marked “passes near Laban”. Place matching starts from the third letter.
Choosing a Place
When many stops sit close together, they're grouped into a single numbered cluster pin you can open.
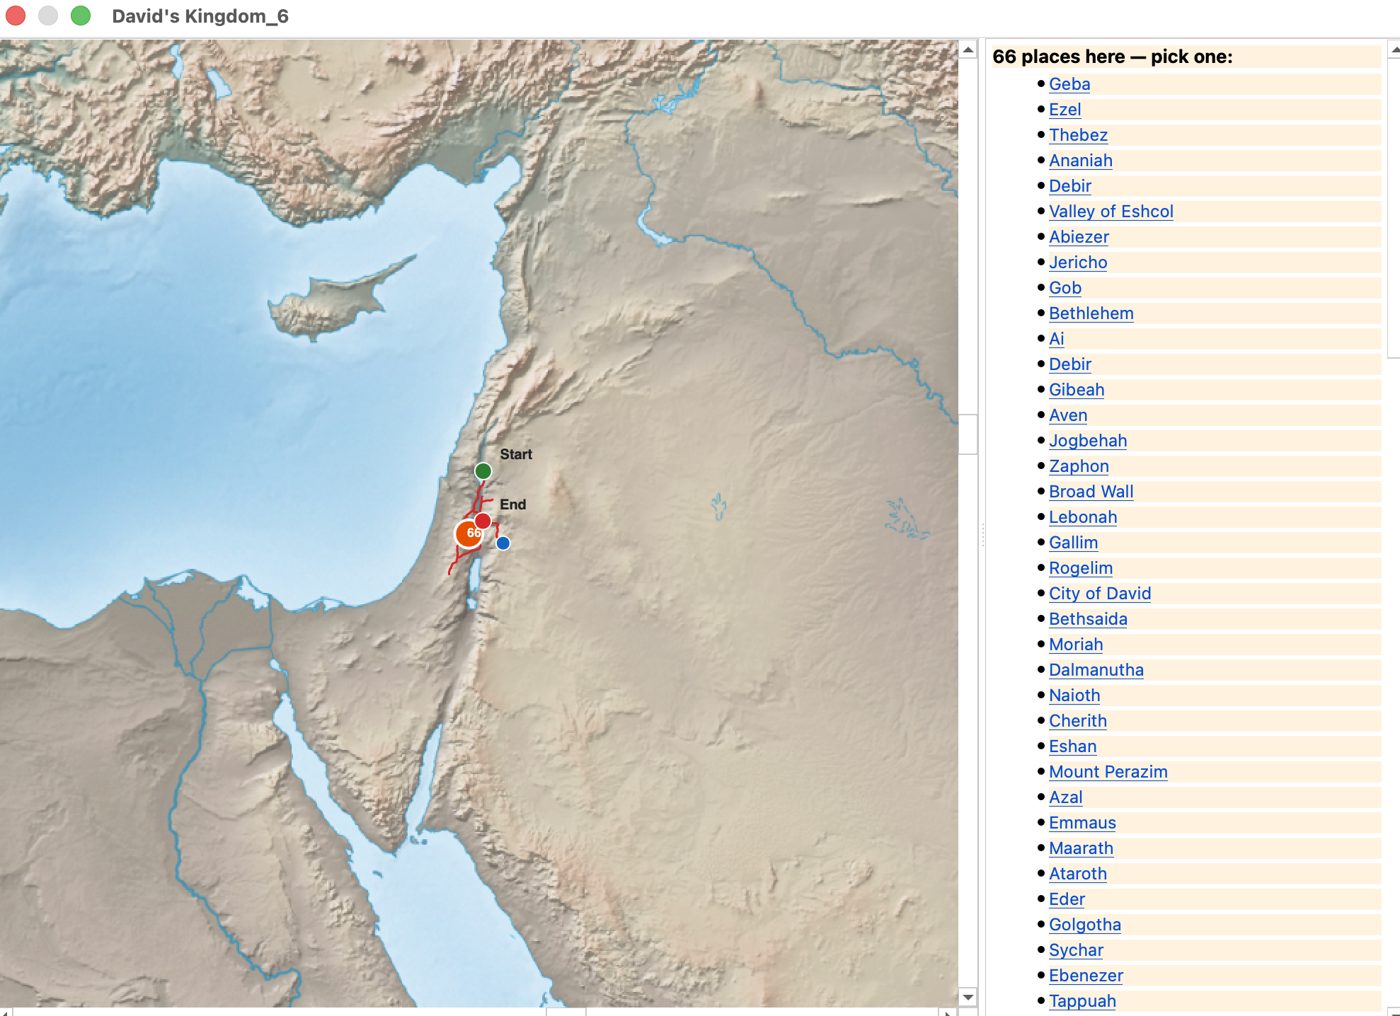
A cluster of 66 nearby places, with the list to pick from on the right.
- Green pin: Start. Red pin: End. A numbered orange circle: a cluster of multiple places too close together to show individually at this zoom level.
- Clicking a cluster opens a scrollable list of every place inside it, on the right.
- Click any individual pin directly to see that place's details.
- Click a numbered cluster to open its list of places.
- Click any place name in that list to open its details, exactly as if you'd clicked its own pin.
- Click the Start or End marker, or its label, to open the place at that end of the route.
Place Detail
Selecting any place — directly or from a cluster list — replaces the list with that place's full detail.
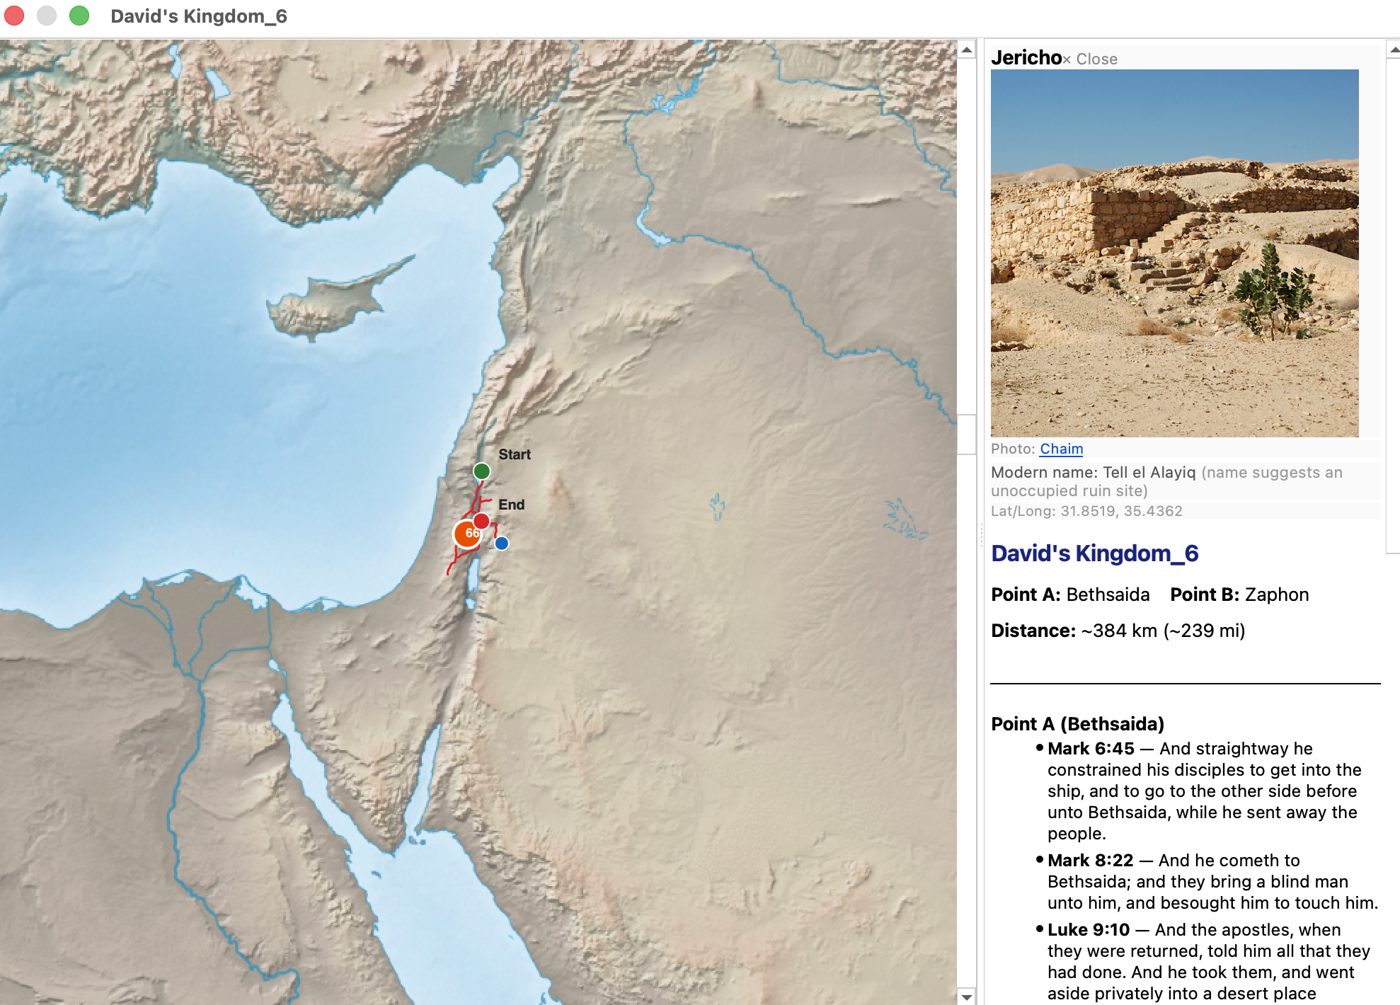
A selected place, with its photo, modern name, and scripture references.
- A real photograph of the site, with the photographer credited by a clickable link.
- Modern name — the place's present-day name. A name with a prefix like “Tell” or “Khirbet” carries a note that this suggests an unoccupied ruin site rather than a currently inhabited place.
- Latitude/Longitude for the exact location.
- The journey's own Point A and Point B, and the real distance between them in kilometers and miles.
- Every scripture reference tied to this specific stop, grouped under Point A or Point B, with the verse text shown directly.
Click × Close, at the top right of this pane, to return to wherever you were before — the place list, or the cluster picker.
Bible Places Near This Route
Below a journey’s details, the panel lists every Bible place the route passes near, as links. Click a name to see that place, exactly as if you’d clicked its pin; × Close brings you back to the same name in the list. These are places near the route — not all of them appear in that journey’s story.
On Old Testament journeys, places named only in the New Testament (such as Bethsaida) are left out, so the list stays true to the period. A place’s scripture references are the verses that refer to that place itself — so a place that shares its name with a person, like Laban, shows only the verses about the place.
Concepts
Concepts gathers verses under headings — such as Salvation, Throne of David, or Thief on the cross — as a starting point for your own study. Click Concepts, in the Explore group, to open the list of headings.
- Choose a heading by double-clicking it, pressing Enter, or selecting it and clicking Show Verses. The window closes and that Concept’s verses appear in the results list, where they read and open exactly like search results.
- Some Concepts group their verses under sub-headings, shown above the first verse of each group.
- With the keyboard: the arrow keys move through the headings, typing a first letter jumps to a heading, Enter chooses, and Escape closes. Next time you open Concepts, the heading you chose last is selected.
The Concepts window carries one standing line, the same for every heading: “Concepts gather verses under a heading as a starting point for your own study.” The LivingWordApp doesn’t comment on what the verses mean.
While the Concepts window is open, and alongside every Concept you choose, the details panel on the right also shows two verses: Proverbs 25:2, “It is the glory of God to conceal a thing: but the honour of kings is to search out a matter,” and 2 Timothy 3:16, “All scripture is given by inspiration of God, and is profitable for doctrine, for reproof, for correction, for instruction in righteousness.”
Sandbox — The Numerics Workbench
Sandbox is the deep-research tool for Biblical numerics (gematria). Unlike Forensics, which gives you one static snapshot, Sandbox lets you build up a branching tree of discoveries over time, combine numbers together, check them against known number patterns, and save your work to come back to later.
Starting a New Card
Every piece of research in Sandbox starts as a “card.” There are three ways to create one, using the three rows near the top of the Sandbox window:
- Word/Phrase — type any word or phrase to see its gematria value (English, Hebrew, and/or Greek, using the checkboxes provided) and its real King James Version occurrence count.
- Verse — choose a book, chapter and verse, then click Add Word-by-Word Breakdown. You get a card for the whole verse, with a card for each word showing its gematria value and a running total, in each language ticked: English (the King James words), Hebrew (Old Testament verses) and Greek (New Testament verses). For example, Genesis 1:1 totals 411 in English and 2,701 in Hebrew.
- Number — type any number directly, with no lookup, to use as a starting point for your own calculations.
Note: The English, Hebrew and Greek checkboxes apply to both the Word/Phrase row and the Verse breakdown. English is off by default, and Hebrew and Greek are on — this reflects that Hebrew and Greek gematria are long-standing historical practices, while English gematria (A=1, B=2, and so on) is a modern convention. Hebrew applies only to Old Testament verses and Greek only to New Testament verses; ticking one for the other Testament gives a short message instead of a card. If none is ticked, the breakdown is in English.
Note: Hebrew and Greek values are for single words. For a phrase, add its verse with Add Word-by-Word Breakdown and remove the words you don’t need (the totals follow), or type the Hebrew or Greek itself in the Word/Phrase box, as one word or several. For example, the Greek of the inscription in Matthew 27:37, ουτος εστιν ιησους ο βασιλευς των ιουδαιων, totals 5,906, shown word by word with a running total.
Note: In a Hebrew or Greek breakdown, each word is shown in the original script with its transliteration, for example בְּרֵאשִׁית (re.shit) — 913. The Hebrew words come from the Westminster Leningrad Codex (the Open Scripture Hebrew Bible) and the Greek words from the Textus Receptus (Robinson’s edition), the same texts used by Interlinear. A Hebrew word’s attached prefixes, such as and or the, are counted as part of that word, as written. Select the verse’s total card and use Profile Check to explore its number further, for example its prime factors.
There is also a Case-Sensitive checkbox for Word/Phrase occurrence counts, off by default — turn it on if you specifically need to distinguish, for example, “Spirit” from “spirit.”
The Canvas
Every card you create appears in the canvas below, and can have child cards branching from it — for example, the result of combining two cards appears as a new card underneath one of them, so you can always trace how a result was reached.
Working with a Card
Use ◀ Previous and Next ▶, at the bottom of the Sandbox window, to step through your cards one at a time — the current one is named next to “Currently selected.” You can also move through the cards with the arrow keys in the card list, press Space to tick a card’s Export box, and press Delete to remove the selected card. With a card selected, use the buttons beside it:
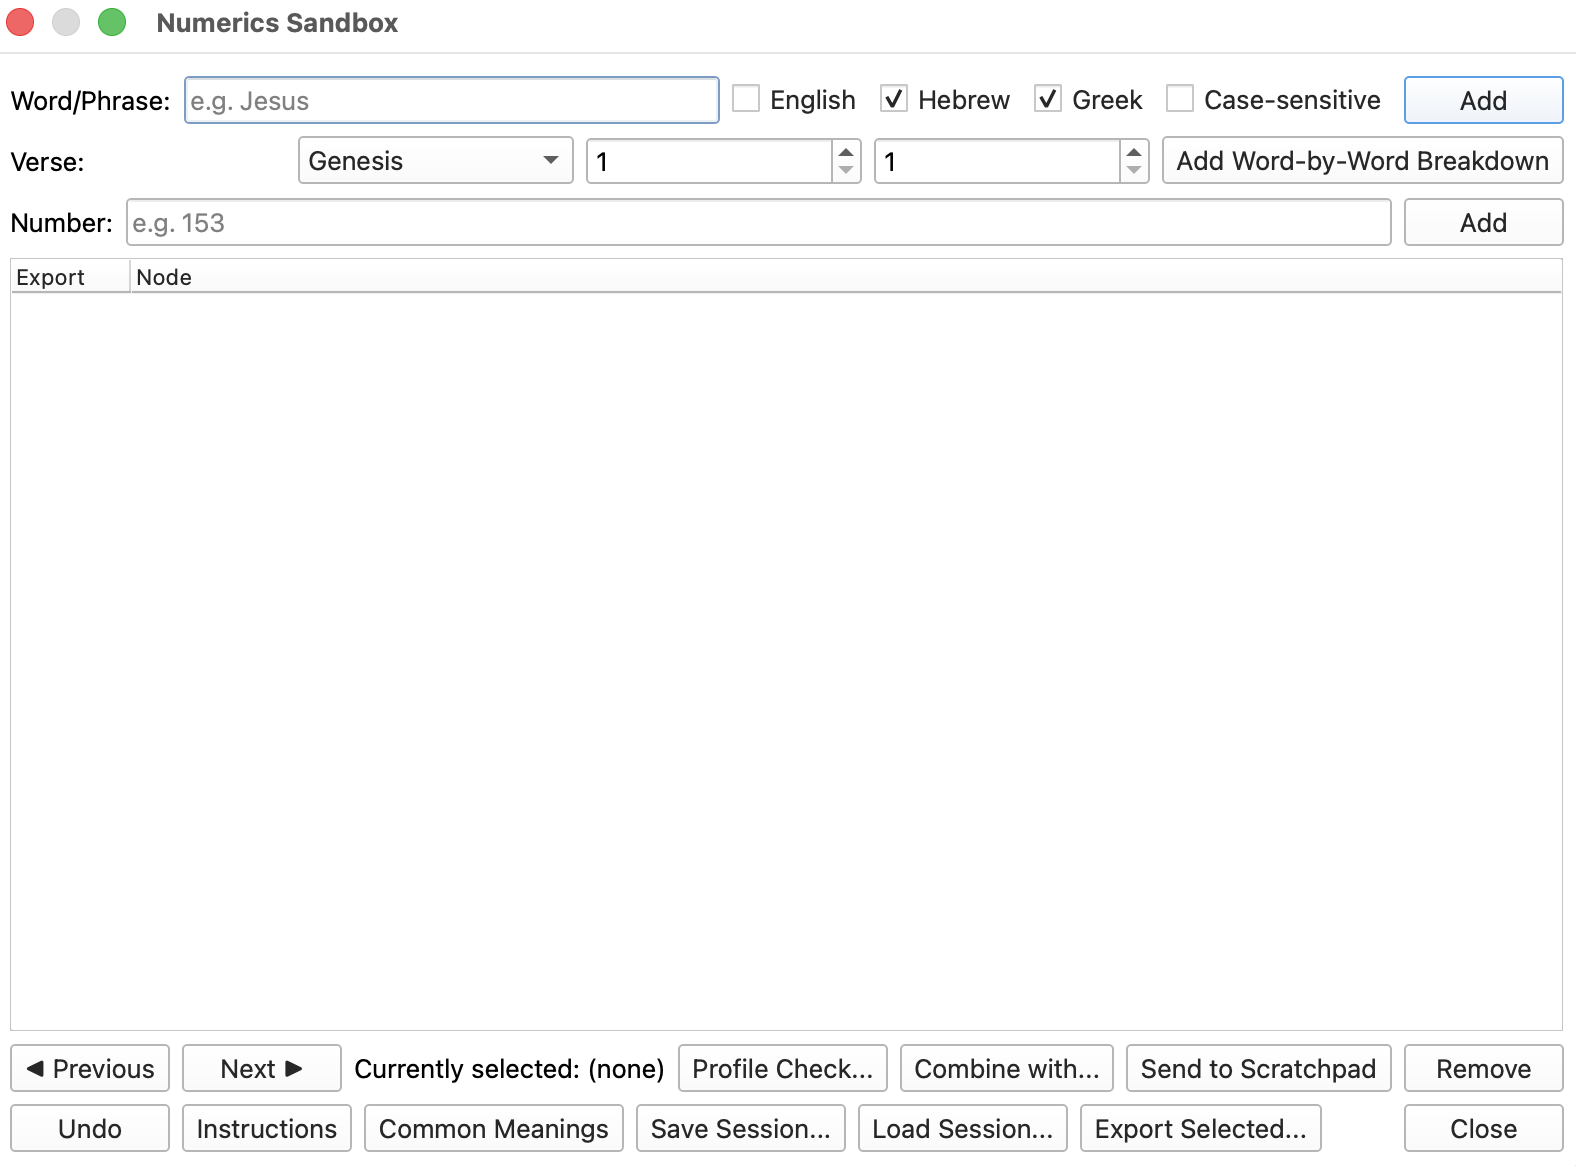
The Numerics Sandbox, ready for a new entry.
- Profile Check... — Prime?, Triangular?, Armstrong?, Perfect Square?, Perfect Cube?, Prime Factorization, and Digital Root. Each adds a new child card showing the result.
- Combine with... — opens a small calculator. Pick another existing card, or type any number, then choose Sum, Product, or either direction of divisibility (“Does A divide B?” or “Does B divide A?”). Click Calculate to preview the result, then Add to Canvas to keep it.
- Send to Scratchpad — copies this card (and everything branching from it) into the separate Scratchpad module, described later, without removing it from Sandbox. It’s also on the menu that opens when you right-click a card.
- Remove — deletes this card and everything branching from it, as one single action. To remove several cards at once, Shift-click a run of cards, or Ctrl-click (⌘-click on a Mac) each one, then click Remove or press Delete; one Undo brings them all back. When you remove words from a verse breakdown, the verse’s total and the running totals are worked out again from the words that are left, and the total card says how many words it now holds, for example “(7 of 17 words)”.
Undo
The Undo button at the bottom reverses the single most recent action, one step at a time — useful if a Remove or Combine didn't turn out the way you expected.
Common Meanings
Opens a reference screen listing traditional interpretive meanings for numbers 1 through 40 (for example, 7 is traditionally associated with spiritual completeness, and 40 with a period of testing). This is background reference material, not a live calculation — it doesn't change based on what's in your canvas.
Instructions
A short, scrollable in-app reference covering the same Sandbox mechanics summarized above — handy as a quick reminder while you're working, without needing to come back to this manual.
Saving and Exporting Your Work
Three buttons handle saving your Sandbox research. Each opens your computer's own Save or Open window:
- Save Session — saves your entire canvas to a file you choose, so you can close the app and pick up exactly where you left off later.
- Load Session — opens a previously saved session file, replacing whatever is currently in the canvas.
- Export Selected — each card has a small checkbox; check the specific cards (and their branches) you want, then use this to save just those as a plain, readable text file — useful for sharing a specific finding without exporting your whole research tree.
Note: Checking a card automatically checks everything branching from it. You can still individually uncheck specific branches afterward if you only want part of what's under a checked card.
Notes
A general-purpose place to jot down anything worth remembering — a scripture reference, a word, a date, or any other note — completely separate from the numeric research in Sandbox and Scratchpad.
- New Note — starts a blank note. Give it a Name and type your note.
- Save — saves the open note straight away. You rarely need it: notes save themselves a moment after you stop typing.
- Delete — removes the currently selected note.
- Export Selected — saves the selected notes as a plain text file. To choose more than one, hold Ctrl (⌘ on a Mac) and click each note in the list.
The list shows each note by its name. Notes don’t show the date they were written, so a name like “Genesis 1:1 — word count” helps you find one later.
Notes are kept on your drive, so they go with you to every computer you use, and they'll still be there the next time you open the app. See “Your Work: Saving and Backing Up” for how to keep a backup copy.
Compare — Translation Comparison
Compare shows the King James Version side-by-side with another translation of your choice, for direct, word-for-word comparison.
Choosing a Translation
Use the dropdown menu to choose which translation to compare against the King James Version. Seven translations are available, each in the public domain or under a compatible free license: the Berean Standard Bible, the Literal Standard Version, the American Standard Version, the Darby Bible, the Webster Bible, Young's Literal Translation, and the Catholic Public Domain Version.
Navigating
Choose a book, chapter, and verse using the controls at the top. Both panels scroll to the same chapter, with your chosen verse highlighted in each, so you can compare the exact same passage across both translations at a glance.
Note: Not every translation includes every verse at the same numbering — a small number of verses present in the King James Version are omitted in some other translations, reflecting differences in the underlying manuscripts each translation is based on. Where this happens, the missing verse is clearly marked “not present at this verse number,” rather than silently skipped or misaligned.
Word/Phrase Count
Type a word or phrase and click Count to see how many times it appears in the King James Version and in all seven other translations at once — a quick way to compare how consistently a word is used across translations. Counts can differ simply because translations choose different words. For example, the Literal Standard Version never uses “repent”: where the KJV has “Repent” in Matthew 3:2, the LSV has “Convert”, and Young’s Literal Translation has “Reform”. So a count of 0 can be the true answer, not a fault.
Show Locations
Click Show Locations (after typing a word or phrase) to go further than a simple count: see the exact list of verses where each translation uses that word, and a clear summary of any verses where the translations genuinely disagree — one has the word, another doesn't.
What Changed
Choose a verse and a translation, then click What Changed (beside the translation menu). Every difference in wording between the King James Version and that translation is listed, sorted by type: different wording (for example, Repent ye → Convert), words found in only one of the two, word order, words the translators marked as supplied, singular or plural, spelling, updated English (such as maketh → makes), and small words such as the, and and of. It also shows how many words are identical, with both verses in full. If the translation doesn’t contain the verse, the report says so.
Note: How differences are sorted. The types follow fixed rules, so anyone could check them by hand: older and modern forms of the same word (thee → you, hath → has, saith → says, maketh → makes), spelling (honour → honor), singular and plural (heaven → heavens), words the translators themselves marked as supplied with [brackets], small words (the, a, and, of, to, in and similar), and word order. A stretch of words that is reworded is shown as a whole phrase (is at hand → has come near) rather than forced into word-for-word pairs. The report shows what differs; it does not judge whether a difference matters. That is left to you.
Verses Not in Every Translation
Click Verses Not in Every Translation to list every King James verse that one or more of the other translations doesn’t contain, with the KJV text of each and how each translation stores it: no verse at that number, or the verse left empty. A summary line gives the total for each translation. Translations differ here because they follow different Greek and Hebrew source texts; Acts 8:37 is a well-known example.
Note: The Catholic Public Domain Version (CPDV) numbers many verses differently from the King James Version, following the Latin Vulgate, most of all in the Psalms. Comparing it number by number would mistake numbering for omission, so it is named in the report rather than listed. Numbered placeholders with no text, such as two in the Literal Standard Version, are reported as numbering, not as verses.
Follow a Word
Follow a Word traces one original Hebrew or Greek word through every translation. Choose a verse, click Follow a Word (beside the translation menu), and pick one of that verse’s original words from the list — for example μετανοειτε (G3340) in Matthew 3:2. The report shows the word’s lexicon entry; every verse where it occurs; for each translation, the English words found in those verses and in how many of them (for example, repent in the KJV, convert in the Literal Standard Version and reform in Young’s Literal Translation); and what each translation’s main word meant in Webster’s 1828 dictionary.
Note: How Follow a Word counts. The original-language text marks each word with its Strong’s number, so every verse containing the chosen word can be found exactly. The translations carry no such marking, so the report counts the English words that appear in those same verses, and lists a word when it appears in a large share of them and is much more common there than elsewhere in that translation. Forms of a word are grouped (repent, repented, repentance) and every form counted is shown. The most widespread word is shown as each translation’s main word; other words that stand out are listed as “also frequent in these verses”, which often reflects what the verses are about (earth, in verses about creation) rather than a translation of the word. A word appearing in the same verses strongly suggests, but does not prove, that it translates the original word; the lexicon and dictionary entries are there so you can weigh the evidence yourself. Old Testament words are followed in the Hebrew text and New Testament words in the Greek (Textus Receptus). If some of the verses are not found at the same number in a translation, its counts are out of the verses found, and the report says how many were not found (the Catholic Public Domain Version numbers some verses differently).
Export to Notes
After using Show Locations, What Changed, Verses Not in Every Translation or Follow a Word, click Export to Notes to save that report as a new note in the Notes module, for safekeeping or later reference.
Scratchpad
A standing, long-term space for numeric discoveries you want to keep separate from your current line of research in Sandbox. Whatever you send here stays here, from one session to the next, until you remove it.
Scratchpad has no entry points of its own — cards arrive here only through Send to Scratchpad on a card in Sandbox — the button, or the card’s right-click menu (see “Working with a Card” above). Once a card is here, it has the same tools as Sandbox: profile checks, Combine, Remove, and Undo, and the same keys in the card list.
Sending a card to Scratchpad copies it — the original card stays exactly where it was in Sandbox.
Saved Searches
Saved Searches keeps searches you want to run again without retyping them. Open it from My Workspace → Searches. There are three ways to save the current search:
- Right-click a verse in the search results and choose Save This Search.
- Press Ctrl+S (⌘S on a Mac).
- Click Save Current Search in the Saved Searches window.
A saved search remembers the books ticked in Index when you saved it. Saving the same search twice is refused, so the list stays tidy. In the Saved Searches window, Run Selected runs a search again and Delete Selected removes it. With the keyboard, Return runs the highlighted search and Delete removes it, after asking.
Interlinear — Hebrew and Greek
Interlinear shows the Bible word by word in its original language — Hebrew for the Old Testament and Greek for the New — with each original word lined up alongside its transliteration (how it sounds, in English letters) and its English meaning.
- Hebrew reads from right to left, so in the Old Testament each line starts at the right-hand side.
- Lines fit themselves to the window. Make the window wider, or drag the divider between its panes, and the words rearrange to fill the space, so no word is ever cut off at the edge.
- Transliterations use a dot between syllables (for example, a.mar), to help with pronunciation.
Cross-refs — Cross-References
Cross-refs, in the Study a verse group, shows the cross-references for the verse you're reading: the verse your cursor is on in the page view, or the verse chosen in the verse list. They are listed in Bible order, Genesis to Revelation.
- Click a reference, or move to it and press Enter, to open that verse in its chapter.
- “Put all … verses in the results list” puts every cross-reference into the results list, where they read and open just like search results.
- “Show the verses that point to …” turns the list round: every verse whose cross-references point to the verse you're reading. A link at the bottom takes you back.
- All of them are shown. The few that were voted not relevant are left out, and the panel says how many.
Your Work: Saving and Backing Up
Where Your Work Is Saved
Everything you create — notes, Scratchpad cards, and saved searches — is saved on the drive, in the TheLivingWordApp Data folder. Because it lives on the drive, your work goes wherever the drive goes: plug it into any of your licensed computers, Windows or Mac, and your work is there.
Saving is automatic and built to be safe. Each save is written in full before it replaces the previous one, so even if the drive is pulled out mid-save, your work isn't left half-written. The LivingWordApp also keeps recent earlier versions of your work in a “Previous versions” folder inside TheLivingWordApp Data, and uses them automatically if a file is ever damaged.
Sandbox sessions and exported text files are different: they go wherever you choose in the Save window.
Backing Up Your Work
A thumb drive can be lost, broken, or left behind, so it's wise to keep a backup.
- Click My Workspace, then choose My Work.
- Click Back up my work….
- Choose where to save the backup, and click Save.
Your notes, Scratchpad, and saved searches are saved together as one backup file ending in .lwbackup.
Save your backup somewhere other than the drive — on your computer, on a second drive, or in cloud storage. A backup kept on the same drive is lost along with it.
Restoring From a Backup
- Open My Workspace → My Work, then click Restore from backup….
- Choose your .lwbackup file.
- Confirm when asked.
The LivingWordApp checks the whole backup file before changing anything, and refuses a damaged or unrecognized file. Before restoring, it also saves your current work as a “Before restore” backup, so a restore can itself be undone.
The Safety Copy on This Computer
The My Work window also has a setting, Also keep a safety copy on this computer. It's off unless you turn it on. When it's off, The LivingWordApp writes nothing about your work to the computer — everything stays on the drive.
When it's on, the computer keeps one up-to-date copy of your work, refreshed each time you save. That's useful on your own computer, in case the drive is ever lost. Leave it off on shared or work computers, so your notes aren't left behind on them. The setting is separate for each computer, and turning it off offers to delete the copy already there.
Troubleshooting
“This copy is already activated on the maximum number of computers”
This means your license’s computer limit has been reached. If an old computer was retired or replaced, your license can be reset once in any 12 months — see “If You Get a New Computer” below.
The App Won't Open
- Make sure the thumb drive is still fully connected and hasn't been ejected.
- Try unplugging and reconnecting the drive, then try again.
- On Windows, start the app with Start TheLivingWordApp at the top of the drive.
- If you see “No license file found”, the license file may have been deleted, or the drive reformatted. The file is hidden on the drive, so it isn’t normally visible. Contact support with your license ID; a reset file restores it.
- If the first launch seems stuck on a black window, wait a full minute; see “Security Checks” in Getting Started.
A Security or Antivirus Message Appears
This is expected the first time you run The LivingWordApp on a computer. See “Security Checks” in Getting Started for what to click. If your antivirus program blocks the app outright, note the program's name and contact support.
Smart App Control (Windows 11): some Windows 11 computers have a feature called Smart App Control turned on. It blocks programs that are not digitally signed, without offering a “Run anyway” choice. The LivingWordApp is not digitally signed, so it cannot run on a computer where Smart App Control is on; you can see whether it is on in Windows Security, under App & browser control. If it is, please use The LivingWordApp on another computer.
Blocked on a Work, School, or Church Computer
Computers managed by an organization often have a Windows Security rule that stops programs from running from a USB drive. If Windows Security shows “Risky action blocked” (under Protection history), that rule is the reason. Only the organization’s IT department can change it, so please use The LivingWordApp on a personal computer instead.
Part of the Window Is Cut Off
On small laptop screens, or when Windows is set to enlarge everything, the window may not fit, and buttons at the edge can be hidden. To check, open Settings, then System, then Display, and look at Scale. Choosing a smaller value such as 100% or 125% gives The LivingWordApp more room. If you use the Larger text size, switching to Standard (Ctrl and −) also helps.
A Specific Feature Shows an Error or No Data
If one specific module (such as 1828, or a specific translation in Compare) shows an error or no results while everything else works normally, contact support with a description of exactly what you were doing when it happened.
If the App Closes Unexpectedly
Each time The LivingWordApp starts, it keeps a short record of its start-up steps, and of any error, in a file named crash_log.txt on the computer (not on the drive). It records nothing of your notes, searches or other work.
If the app ever closes unexpectedly, please email that file to [email protected], with a line about what you were doing. On Windows it is in your user folder, in a folder named .living_word_app (for example C:\Users\YourName\.living_word_app\crash_log.txt). On a Mac it is in your home folder, in a hidden folder named .living_word_app: in Finder, press ⌘+Shift+G, type ~/.living_word_app and press Return.
Your License
Your copy of The LivingWordApp is licensed for two computers, or three if you bought the third computer with the drive. The first computers you run it on are remembered automatically; after that, running it on any further computer is refused with a clear message. The limit can’t be raised later: another computer needs another drive.
One license covers both the Windows and Mac versions on your drive. Each computer counts once, whichever version it runs.
If You Get a New Computer
If one of your computers is retired or replaced, your license can be reset once in any 12 months, free of charge:
- Email [email protected] from the email address you ordered with, and include your license ID (it’s in the email sent when your drive shipped).
- You’ll receive a small file named license_reset.json. Save it onto your drive, at the top, beside Start TheLivingWordApp. Don’t rename it.
- Open The LivingWordApp as usual. The reset happens by itself, and the file disappears from the drive once it’s done. Your computers then register again as you use them.
Each reset file works once. A further computer within the same 12 months needs another drive.
Keeping the App on Its Original Drive
Keep using The LivingWordApp from its original thumb drive, rather than copying it onto a computer's hard drive. Copies can track computers separately from your drive's license, which may make the computer limit behave unexpectedly — and work saved in a copy wouldn't be on your drive.
Support
For help with your license, a warranty claim, or any question not covered in this manual, email [email protected] or visit thelivingwordapp.org. Include your license ID for license or warranty questions.
Warranty: your drive is covered for 90 days from delivery. If it arrives faulty or fails in that time, you’ll get a free replacement with the same license ID, and you don’t need to send the old drive back. See the Warranty on the drive.
Tell Us What You Think
We’d love to hear how The LivingWordApp works for you: what helps, what’s unclear, and anything that doesn’t work the way this manual says. Email [email protected].
If you’re reporting a problem, it helps to mention whether you use Windows or a Mac (and which version), what you were doing, and any message exactly as it appeared — a photo of the screen is ideal.
If you’d like the manual in another format, ask us.